Linux Namespaces: How Docker Fakes a Whole Machine
This time i decided to start with Kernel namespaces. TBH, i enjoy low level systems but by hands of GOD, i’m backend engineer now and working on high level systems. so writing things about low level is just a hobby!
While cgroups (control groups) are mandatory for resource management (limiting CPU/RAM), they are “invisible” to the containerized process. Namespaces, on the other hand, are what make the container actually feel like a separate system to the process running inside it. this is why I’m continuing with Namespaces first.
Galaxy far far away we heard much about VMs which they made isolation for our applications. each apps needs a new Operating systems and need to install bunch of applications and overheads. but suddenly Containers comes out of the blue and shown their ability to isolation without needed extra operating system. many containers there, faster and much lower overheads. things got better and better. but this time is not a real isolation. is illusion of isolation that also brings pros and cons. i will talk about it later.
in previous topic i talked about the overlayFS which was (disk) and Namespaces are environment.
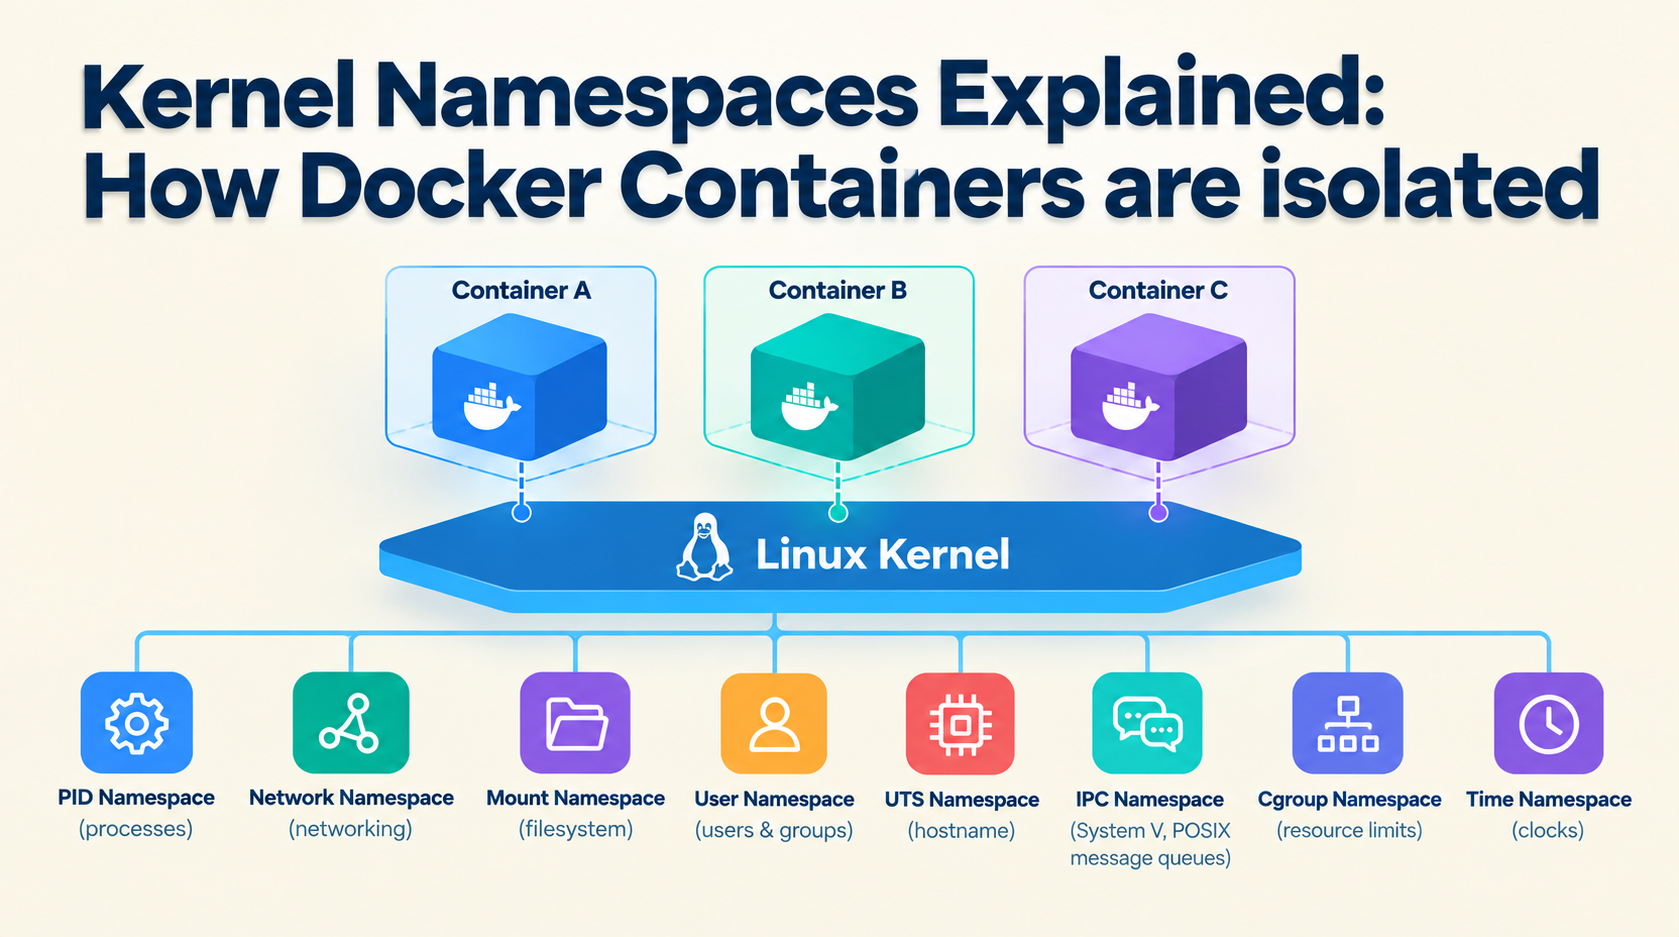
Why Namespaces are used plural and not just a namespace? because we have many type of them and for each isolation (containerizing) may use some of them. 7 types of Namespaces will discussed that used by docker to make container illusion 👻
What are Namespaces?
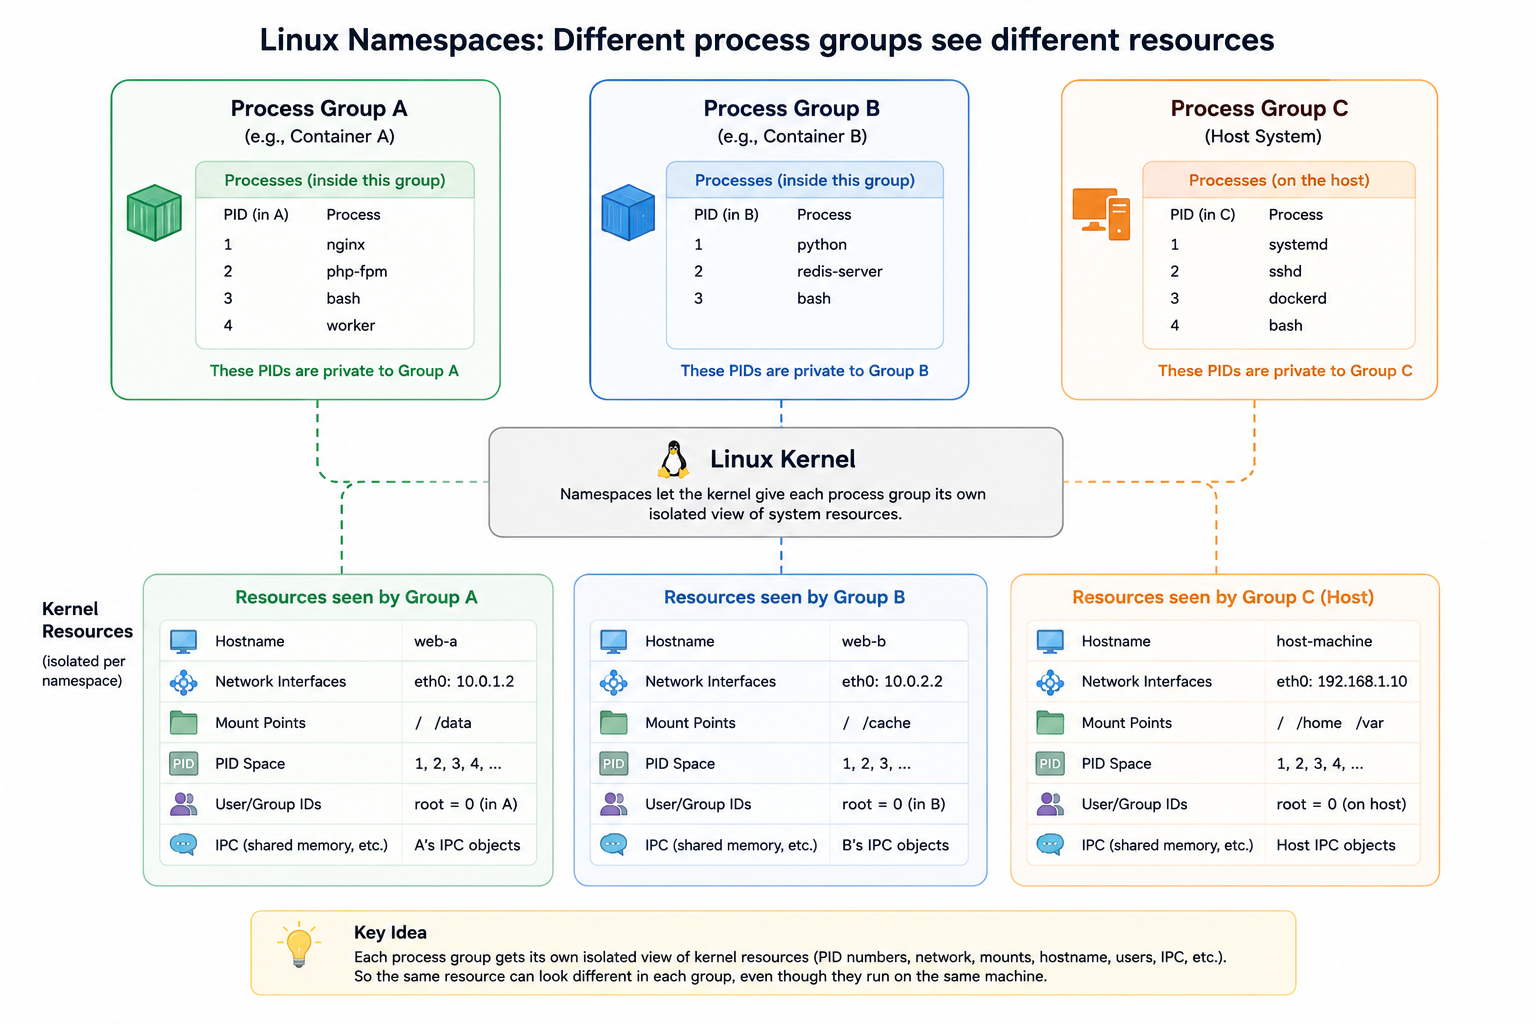
Namespaces are a Linux kernel feature that let different groups of processes see different versions of the same system resource. For example, one group of processes (like the ones inside a Docker container) can have its own private list of process IDs, its own network setup, and its own hostname. they are completely separate from another group of processes running on the same machine.
What are the process and set of the them?!
A process is just a running program. Every time you start something nginx, php, bash a Docker container. the kernel creates a process for it. Each process has its own memory, its own list of open files, and so on.
A “set of processes” just means “a group of processes.” For example:
- All the processes running inside Container A = one set
- All the processes running inside Container B = another set
- All the processes running directly on your host machine = another set
What are “kernel resources”?
The Linux kernel manages many things that processes need to work with. These things are the “resources.”
Some examples:
| Resource | What it means |
|---|---|
| Process IDs (PIDs) | The numbers used to identify each process |
| Network interfaces | IP addresses, ports, routing tables |
| Mount points | Which filesystems are mounted where (like /, /home, /proc) |
| Hostname | The machine’s name |
| User/group IDs | Who “root” is, which users exist |
| Inter-process communication (IPC) | Shared memory, message queues between processes |
There is 8th Kernel namespace time, which lets a container have its own view of CLOCK_MONOTONIC/CLOCK_BOOTTIME. Docker doesn’t use it by default.
Let’s create a new Namespace
Creating a new namespace to run your app inside it is really easy. just one command with the right flags to go! Linux gives us the unshare command for exactly this.
sudo unshare --uts --pid --mount --fork bashWhat just happened:
-utsnew UTS namespace (isolated hostname)-pidnew PID namespace (isolated process tree)-mountnew mount namespace (isolated filesystem mounts)-forkforks a new process before running the command, which is required when using-pid(the shell itself can’t become PID 1 in the new namespace without forking)
You’re now inside a shell running in three brand-new namespaces. Try this:
hostname container1
hostname
# container1
Open a second terminal on the host and run hostname there. it still shows the original hostname. The change only exists inside your new UTS namespace. That’s the whole trick: same kernel, same machine, but a different view of the system depending on which namespace a process belongs to.
Now check the process tree from inside:
ps auxYou’ll see a tiny process list because this is a fresh PID namespace, and your bash is PID 1 in it, even though on the host it has some completely different PID.
You can confirm which namespaces a process belongs to by looking at /proc/<pid>/ns/:
ls -l /proc/$$/nsEach entry is a symlink like uts:[4026532345] that number is the namespace ID. Two processes sharing the same ID are in the same namespace; different IDs mean they’re isolated from each other, even if they’re running on the same physical machine at the same moment.
This is exactly what Docker does under the hood when it starts a container. just with more namespace types combined at once (net, ipc, cgroup, and optionally user), plus OverlayFS for the filesystem layer you already covered.
Now let’s create a namespace for each kernel namespace we know, and at the end put them all together!
1. UTS namespace ( hostname )
sudo unshare --uts --fork bash
hostname container-uts
hostname
# container-uts
Open a second terminal on the host and run hostname. it still shows the original name. Only the process inside the new UTS namespace sees the change.
2. PID namespace ( process tree )
sudo unshare --pid --fork --mount-proc bash
echo $$
Note: --mount-proc is important. Without it, ps still reads the host’s /proc, so you’d see the host’s full process list even though your PIDs are technically isolated. --mount-proc remounts /proc for the new namespace so ps shows only what’s actually inside it.
3. Mount namespace (filesystem mounts)
sudo unshare --mount bash
mkdir -p /tmp/myns
mount -t tmpfs tmpfs /tmp/myns
mount | grep myns
Check mount | grep myns in a host terminal and nothing there. The mount only exists inside this namespace.
4. Network namespace (network stack)
sudo unshare --net bash
ip addr
A brand new net namespace starts with zero interfaces except a loopback that isn’t even up yet. no eth0, no routes, nothing inherited from the host. This is why Docker has to wire up a veth pair to give a container real connectivity.
5. IPC namespace (shared memory / message queues)
sudo unshare --ipc bash
ipcs -m
Compare with ipcs -m on the host. Any shared memory segment created inside this namespace is invisible outside it, and vice versa. two processes can’t accidentally step on each other’s shared memory just because they’re on the same machine.
6. User namespace (UID/GID mapping)
unshare --user --map-root-user bash -c whoamiNo sudo needed for this one. Inside, you’re “root” (UID 0), but check id from the host side (e.g. cat /proc/<pid>/status | grep Uid) you’re still your normal unprivileged UID there. This is the mapping trick rootless containers rely on.
7. Cgroup namespace (view of the cgroup hierarchy)
sudo unshare --cgroup --fork bash
cat /proc/self/cgroup
This one doesn’t limit resources (that’s cgroups themselves, next post). it just changes what a process sees as its cgroup root, so it can’t see or navigate to sibling/parent cgroups on the host.
Putting it all together
sudo unshare --uts --pid --mount --net --ipc --cgroup --fork --mount-proc bashThat’s six namespaces created at once for this one shell (user isn’t included here. see the note below). Now let’s poke around and confirm each one actually took effect:
hostname container1
hostname
# container1

echo $$
# 1

ip addr
# only "lo", DOWN
ip link set lo up

ps aux
# tiny process list, just your shell and its children

ipcs -m
# empty fresh IPC namespace

cat /proc/self/cgroup
# your own cgroup root, not the host's
Open a second terminal on the host and run the same commands, different hostname, full process list, real network interfaces, host’s cgroup path. Same kernel, same machine, two completely different views of the system.
You can also confirm it from the outside: grab the PID of your namespace bash and compare namespace IDs:
ls -l /proc/<pid>/nsEvery symlink (uts, pid, mnt, net, ipc, cgroup) will show a different number than the equivalent one for a host process that number is the namespace ID, and mismatched numbers mean isolation.
Note on user****: it’s the trickiest one to combine because it changes what “privileged” even means for the rest of the command. Added on its own it’s usually paired with --map-root-user and run unprivileged, but stacking it with the others while running as root (via sudo) needs a bit more care around UID/GID mapping than fits cleanly here. Worth calling out as “the namespace we’re deliberately leaving for its own deeper dive” rather than squeezing it in.
This six-namespace combo, plus OverlayFS for the filesystem (previous post) and cgroups for resource limits (next post), is basically the whole recipe Docker follows to make a container feel like its own machine.
The End
Now that readers know how to create an isolated environment (Namespaces), they will naturally ask: “But what stops this process from consuming all the host’s memory?”
Your answer will be in the next post on CGroups.